Showing posts with label amazon EC2. Show all posts

17 February 2010

SCOM 2007 R2: monitor an Amazon EC2 Linux VM

What a strange idea, you may say...But having some VM in the cloud doesn't meant they must be monitored apart. That said, it's quite a challenge:

  • Management Packs from Microsoft don't support Fedora
  • Authentication on VM Amazon are certificate based by default

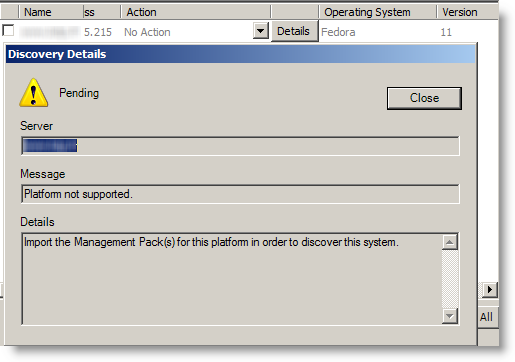
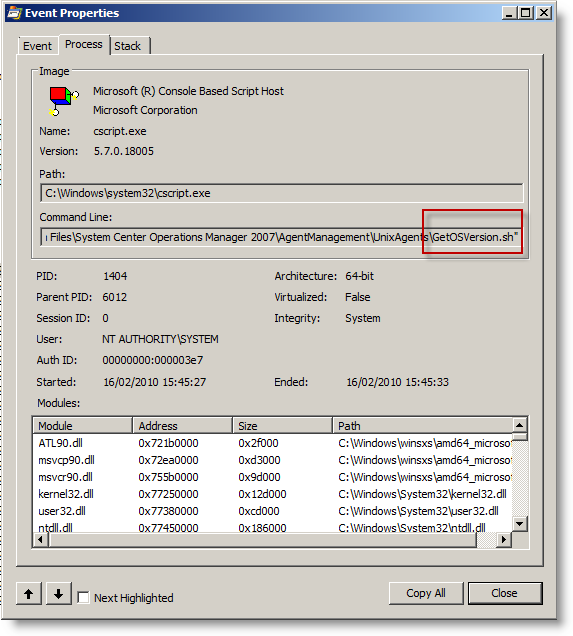
When SCOM detect Fedora, it stop straight forward:To get the Linux version, SCOM execute this shell script here:By the way, this folder also contains RPM package installed next (daemon). Getting on our goal will need works...

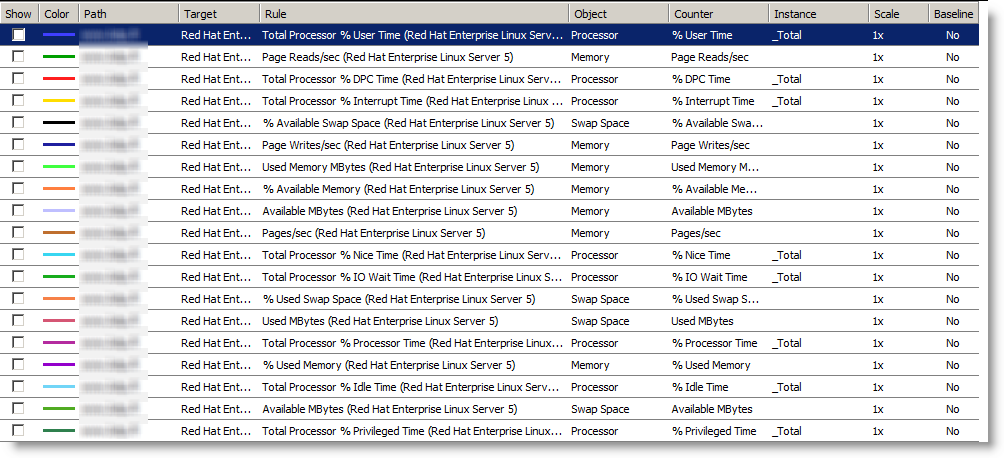
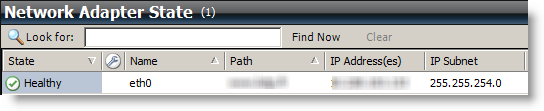
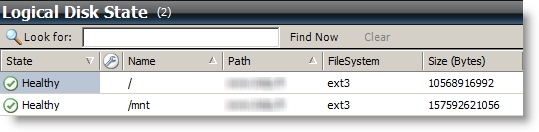
To keep you on, here is one result when it works:Performances SCOM pour une VM Amazon EC2You got it, it's about getting SCOM to believe we have a Red Hat. In fact we have 2 ways:

  • Create our own Management Pack for Fedora.
  • Disguise Fedora as if it was a Red Hat by fooling SCOM.

The first one is the more elegant, but it will take lot of time to get it and then to keep up. So i preferred the second one, as a Fedora is not that far from a Red Hat...

Changes on Linux Amazon EC2


Allow SSH connection without certificate
In /etc/ssh/sshd_config:
PasswordAuthentication yes PermitRootLogin no #Remove also the last line of the file that allow root login without password

Then you need to set a root password:

passwd root

Then reload configuration:

/etc/init.d/sshd reload

Then create a SCOM account:

useradd scom passwd scom
hostname check

By default, the VM got it's internal IP as hostname. SCOM will deploy an RPM to get a daemon running, and will generate a certificate to authenticate.
It's mandatory that the hostname match the name used by SCOM to reach it's agent. The easiest is to change the hostname to a name reachable by SCOM, like you www.mydomain.com:

hostname www.lotp.fr

To keep after reboot, you need to update /etc/sysconfig/network by adding:
HOSTNAME=www.mydomain.com

Dependency

The RPM package from Microsoft depend at least on this 2 libraries:

  • /usr/lib/libssl.so.6
  • /usr/lib/libcrypto.so.6

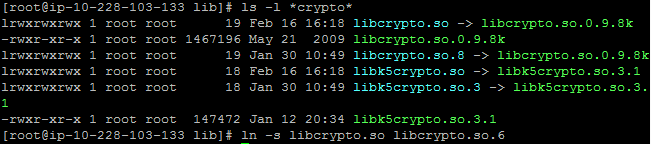
If your system is more up to date (so.8 …), you will need to make symbolics links (ln -s target realfile):

If you don't, you will have these errors messages when installing RPM (first libssl then libcrypto once the first is resolved):

At the end, i have the following symbolics links:
lrwxrwxrwx  1 root root       16 Feb 16 16:19 libssl.so.6 -> libssl.so.0.9.8k lrwxrwxrwx  1 root root       12 Feb 16 16:23 libcrypto.so.6 -> libcrypto.so

I recommend you to copy over the rpm (scx-1.0.4-248.rhel.5.x86.rpm), to check for the good installation result. Else, it will be SCOM that do it during discovery, and error messages are not that explicit.
Moreover, it shows up the name with which the certificate is made:

You can always remove it:

rpm -e scx-1.0.4-248.i386
TCP Ports
SCOM will connect by 2 ways:
  • SSH
  • port 1270 (scom agent)

You will have to set up the Amazon firewall to get these 2 ports reachable. If port 1270 is not reachable, SCOM raise an error about time out, which doesn't help a lot. Traffic to this ports is confirmed by a network trace:

/etc/redhat-release

By default, Fedora create a symbolic link from /etc/fedora-release to redhat-release. You must break it and create a true redhat-relase file with this text inside::

rm /etc/redhat-release echo "Red Hat Enterprise Linux Server release 5" > /etc/redhat-release

Changes on SCOM 2007 R2

Tasks to do:

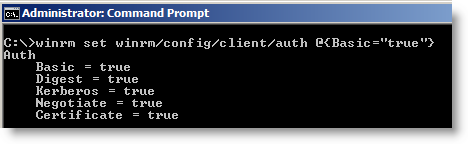
  • Allow WinRM to get basic authentication
  • Import Management Packs Linux/Unix generic and Red Hat
  • Add a Basic Authentication account to log on Linux (not root)
  • Add a Basic Authentication account to log on Linux (Root)
  • Link them to profiles "Unix Action Account" and "Unix Privileged Account"
  • Discover the VM and sign certificate

Adding the VM is straight forward if you followed the tasks before. So i will cover the problems i met.

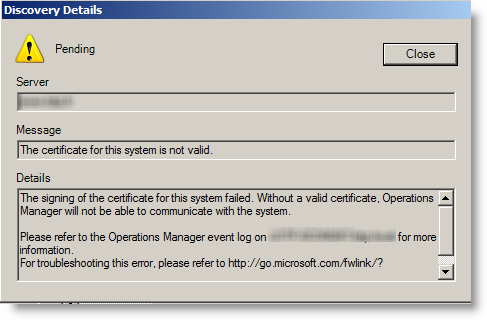
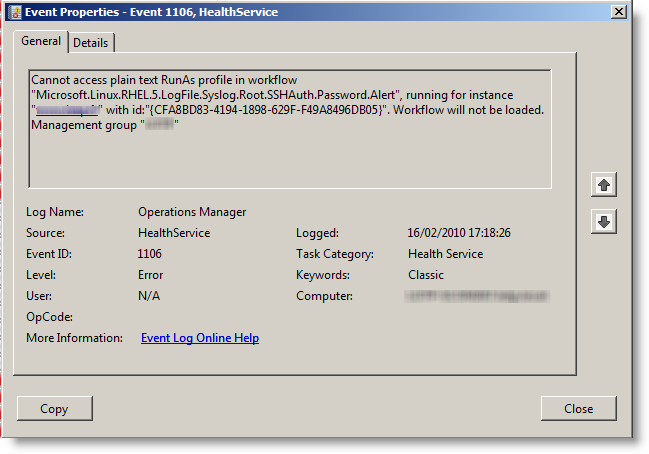
Allow WinRM to do nasic authentication:If you don't have the good hostname, the certificate is refused when it's time to sign it:If you don't add linux account to profiles, workflow don't work:

At the beginning, the VM is not monitored and seen as unknown:

Then it switch to green and known:

Here we go, your VM is now monitored by SCOM 2007 R2.

Here are some screenshots once it works:

08 February 2010

Amazon EC2: Very old Fedora image!

I wasn't mistrustful enough at the beginning. One explanation is that i know Linux, but i never used Fedora before, so i didn't know the actual version number....

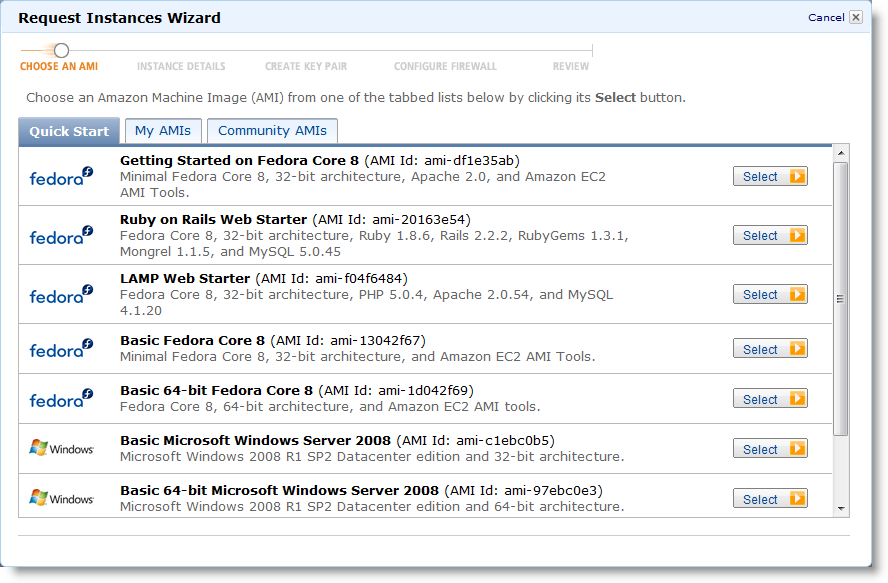
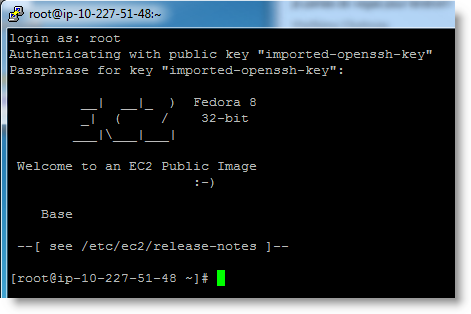
How could i imagine that they provide a 2 years old image ? To remind, here is what they provide:


Version 8 is old enough that you can't upgrade in one shot. You have to upgrade first to version 10 to then upgrade to version 11. I realized that trying to install nagios version 3 without being able to find it...

I found the way to upgrade through Amazon forums:

http://developer.amazonwebservices.com/connect/message.jspa?messageID=141707

In short:

Upgrade to version 10:

yum update -y yum clean all yum update -y yum clean all rpm -Uhv http://mirrors.kernel.org/fedora/releases/10/Fedora/i386/os/Packages/fedora-release-10-1.noarch.rpmhttp://mirrors.kernel.org/fedora/releases/10/Fedora/i386/os/Packages/fedora-release-notes-10.0.0-1.noarch.rpm yum clean all yum update -y yum clean all yum update -y yum clean all

Upgrade to version 11:

rpm -Uhv http://mirrors.kernel.org/fedora/releases/11/Fedora/i386/os/Packages/fedora-release-11-1.noarch.rpmhttp://mirrors.kernel.org/fedora/releases/11/Fedora/i386/os/Packages/fedora-release-notes-11.0.0-2.fc11.noarch.rpm yum clean all yum update -y yum clean all yum update -y yum clean all 

I highly recommend to start by upgrading Fedora version before anything else. As i realized the problem close to the end of my setup, i had packages issues after upgrading, and even some packages i had to remove before upgrading due to dependencies problems!

Mysql

At least the flush privileges wasn't working anymore:

mysql> flush privileges;
ERROR 1146 (42S02): Table 'mysql.servers' doesn't exist
I did a backup before upgrading, and this table wasn't there anyway. I did a Mysql repair & upgrade:
mysqlcheck --all-databases --repair -u root -p mysql_upgrade -u root -p

Yum
Since the upgrade, calling it generate these messages, just before working anyway:
Loaded plugins: dellsysidplugin2, fastestmirror
ERR_OUT: : Bad address
I found the solution in this blog: http://d.hatena.ne.jp/const/20090909
It's due to the smbios-utils package and smbios-utils-python, which helps to get bios informations. Since a virtual machine and i don't have access to bios, i don't care:
yum remove smbios-utils-python

27 January 2010

From dedicated server to Amazon EC2

I am on the way to migrate from a dedicated server (Dedibox, a french provider) to Amazon EC2. Here are my first feedbacks from Amazon Cloud..

Why i am migrating
My current provider is not allowing true virtualization on theirs servers. Their hardware is strong (Dedibox Pro products), but they prevent Hypervisor through their switches which shutdown port whith more than one mac address. So, without VMware ESXi or Hyper-V, i failback on VMware server on top of a CentOS.
VM are just slow, even with only 5 of them. So i have good hardware which i can't truly use and so write off the cost. It's not hazard, virtualization is the best and common way to use these 8GB of ram and quad core cpu.
At least another provider support ESXi, OVH. But they ask quite much money for that (15€/month to be allowed to have more IP...)
As my goal is to get Virtual machines at the end, Amazon EC2 looked quickly as a good choice. In the worth case, i will pay as much as now, but i will get what i pay for!

Step 1: Amazon calculator
Speaking about money, the first difficulty is to know actually how much it will cost! Well, to be honest, the fist one is to understand which instance is the right for me:
  • On demand: no commitment, pay as you use,
  • Reserved: Pay one shoot fee, and then pay as you use at a low cost,
  • Spot: you don't know when you will get your VM, but it will cost less than On demand, but more than Reserved.
As you guess, 1 VM On demand used (powered on) all time costs much more than a Reserved one used all time.
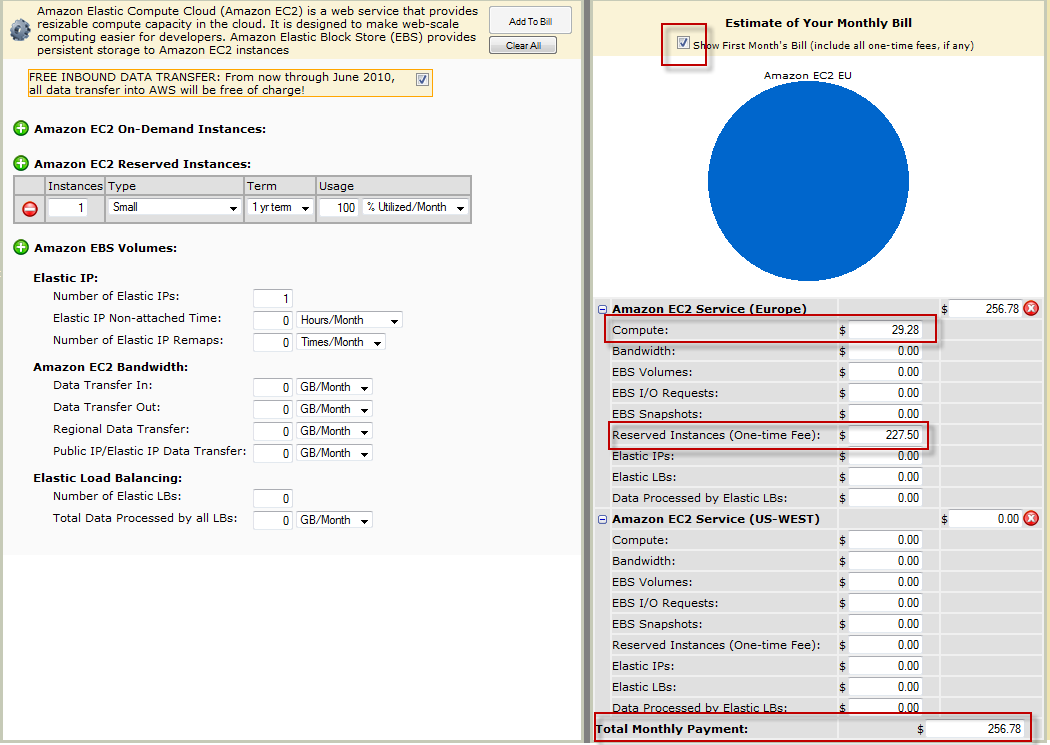
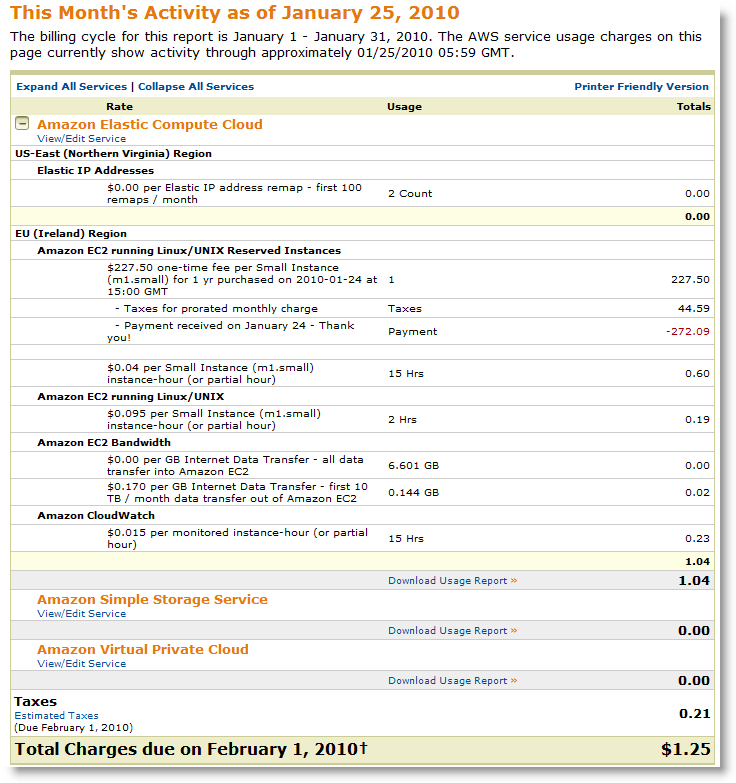
Their calculator have an design issue. By default, it includes the one time fee in the first month free. The quick way is to multiply the numbers you see per 12, and then you get scared for a wrong reason!


So, to get the final cost per month, for one small reserved instance, always on:

(227.50$ + 29.98 * 12) / 12= 48.23$ § month

The average cost of a VM is 34€ per month. For this amount, you have a Linux 32 bit with:
  • CPU: 1 VCPU 1,7Ghz: 1 EC2 Compute Unit (1 virtual core with 1 EC2 Compute Unit)
  • Memory: 1.7GB
  • Storage: 169GB
The weird thing is the 44$ of taxes on the bill (see later in this post)...

Step 2: Reserve an instance
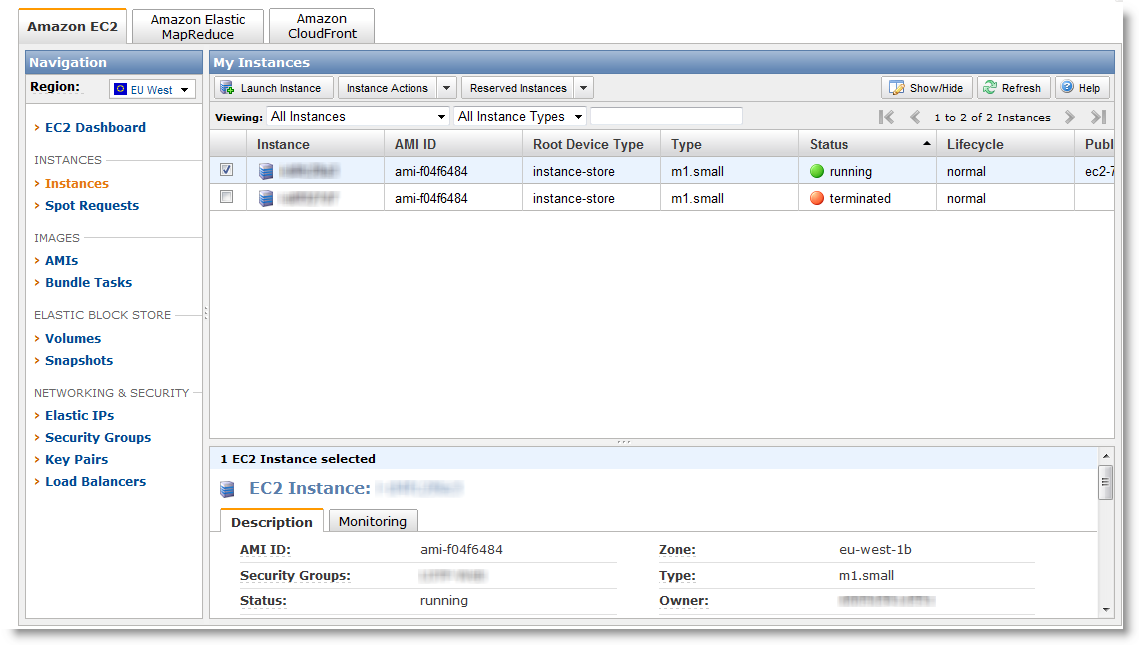
Things are becoming serious! Before, i nevertheless made some benchmark with one On demand VM, to be sure about performance. We choose first the size of the VM (small in my case), where it will be hosted (2 sites in USA, 1 in Europe (Ireland). I chose Ireland, to save the latency over Atlantic. After 5 big clicks, we are pending. After 10 minutes, like on a Formula car race, we are active. Then ? Nothing happens ! No earthquake and no Virtual Machine in the list. Amazon Helps resources are nearly clueless. I finally understood that you have to create a On demand VM, in the same site as your reserved one. As simple as scary, because you don't any word on the interface to comfort you are not going to pay 2 instances. You will have to believe in Amazon and their billing system. Well, it was ok for me, i didn't pay twice!
So far, a reserved instance can only be a linux one. Windows is restricted to On demand, and it's cost is higher than Linux, because the License comes with the VM.
The architecture choice (32/64 bit) depends on the size of the VM.

Step 3: create the VM
Now that i understood and still believe in Amazon, creating a VM is really simple, 5 clicks away and 5 minutes of waiting. You don't install your own OS/ISO, but use a prepared image. They name them AMI (Amazon Machine Image). Amazon have 5 AMI, but the community extend the choice up to 971 AMI.

The storage for Linux is 10GB for system and 150GB for data. The VM see 2 partitions:
Filesystem 1K-blocks Used Available Use% Mounted on /dev/sda1 10321208 1383500 8413420 15% / /dev/sda2 153899044 6793004 139288416 5% /mnt none 870472 0 870472 0% /dev/shm

When you create the VM and later on, Amazon provide a firewall outside the VM. You can then manage flow that come in. It's handy, since we save an iptable:

Step 4: Log on the instance
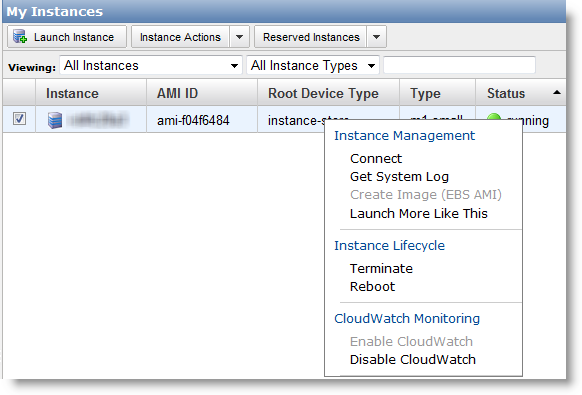
Now that the VM is running, it's time to logon. A right click on the instance shows up this menu:
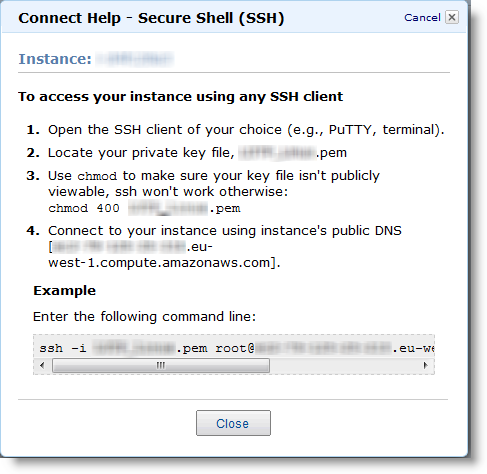
The Connect link gives:

You have understood:
  • No console access (Get System Log shows you the boot log):
  • No root password, but instead a certificate generated when creating the VM)
On Windows, Putty is often used a free ssh client. But Putty can't understand the Amazon certificate. Anyway, Amazon explains how to workaround it here:
http://docs.amazonwebservices.com/AmazonEC2/gsg/2007-01-19/putty.html

In short, you have to use PuttyGen, from the author of Putty, to convert the Certificate in a one Putty understand. After, it works great:

Step 5: Performances
This is the critical part when it comes to Virtual Machines. Good news, i am very happy with the performance:
  • Network: easily get 20Mb/s
  • Storage: 121MB/s in writing (dd if=/dev/zero of=dd.dd bs=1M)
Why does Amazon provide that performance ? Because they bill the network as you use it (0.170$ per GB of traffic). Unlike others hosting that bill all included, Amazon won't loose money if a big user comes in. On my previous provider, i could use 100Mb/s non stop without paying more. So they share a lot connections to outside (peering), and so network is slow.

I prefer to pay a bit more when i use more, but have this quality. We can follow nearly in real time our usage and so next bill: