17 February 2010
Change in blogspot theme
SCOM 2007 R2: monitor an Amazon EC2 Linux VM
- Management Packs from Microsoft don't support Fedora
- Authentication on VM Amazon are certificate based by default
When SCOM detect Fedora, it stop straight forward: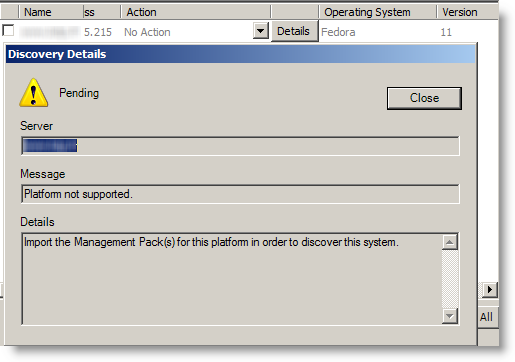 To get the Linux version, SCOM execute this shell script here:
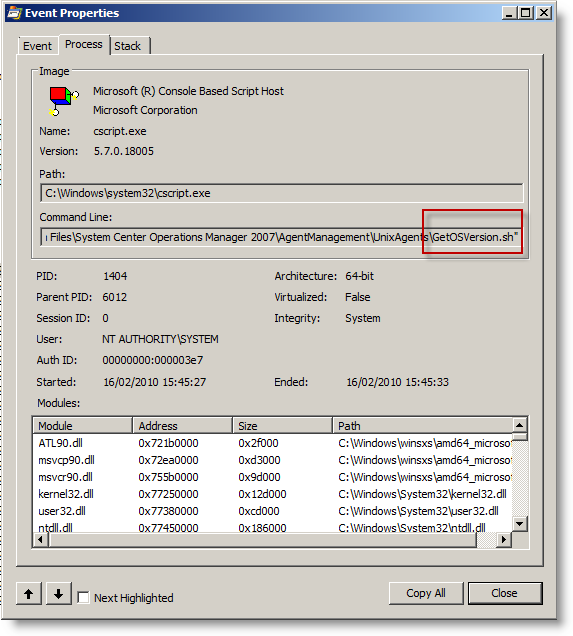 By the way, this folder also contains RPM package installed next (daemon). Getting on our goal will need works...
To keep you on, here is one result when it works: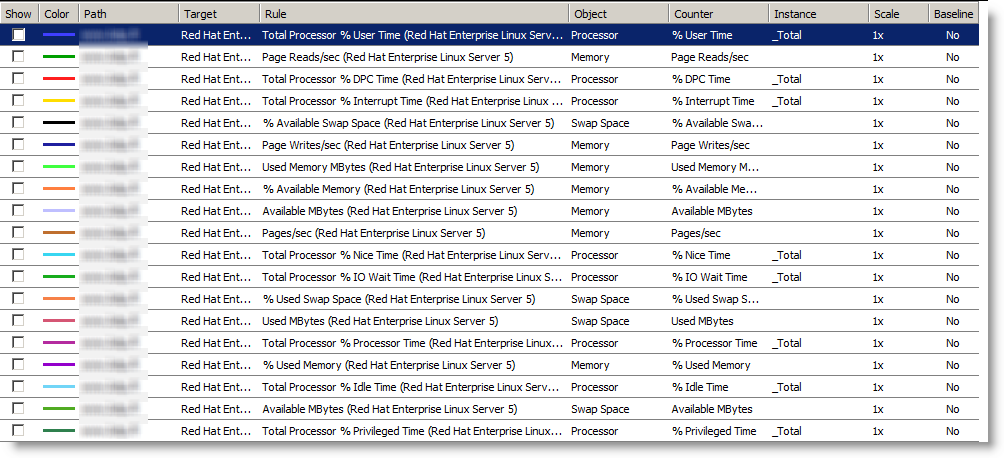 You got it, it's about getting SCOM to believe we have a Red Hat. In fact we have 2 ways:
- Create our own Management Pack for Fedora.
- Disguise Fedora as if it was a Red Hat by fooling SCOM.
The first one is the more elegant, but it will take lot of time to get it and then to keep up. So i preferred the second one, as a Fedora is not that far from a Red Hat...
Changes on Linux Amazon EC2
PasswordAuthentication yes PermitRootLogin no #Remove also the last line of the file that allow root login without password
Then you need to set a root password:
passwd root
Then reload configuration:
/etc/init.d/sshd reload
Then create a SCOM account:
useradd scom passwd scom
hostname check
By default, the VM got it's internal IP as hostname. SCOM will deploy an RPM to get a daemon running, and will generate a certificate to authenticate.
HOSTNAME=www.mydomain.com
The RPM package from Microsoft depend at least on this 2 libraries:
- /usr/lib/libssl.so.6
- /usr/lib/libcrypto.so.6
If your system is more up to date (so.8 …), you will need to make symbolics links (ln -s target realfile):
lrwxrwxrwx 1 root root 16 Feb 16 16:19 libssl.so.6 -> libssl.so.0.9.8k lrwxrwxrwx 1 root root 12 Feb 16 16:23 libcrypto.so.6 -> libcrypto.so
I recommend you to copy over the rpm (scx-1.0.4-248.rhel.5.x86.rpm), to check for the good installation result. Else, it will be SCOM that do it during discovery, and error messages are not that explicit.
Moreover, it shows up the name with which the certificate is made:
You can always remove it:
rpm -e scx-1.0.4-248.i386TCP Ports
- SSH
- port 1270 (scom agent)
You will have to set up the Amazon firewall to get these 2 ports reachable. If port 1270 is not reachable, SCOM raise an error about time out, which doesn't help a lot. Traffic to this ports is confirmed by a network trace:
By default, Fedora create a symbolic link from /etc/fedora-release to redhat-release. You must break it and create a true redhat-relase file with this text inside::
rm /etc/redhat-release echo "Red Hat Enterprise Linux Server release 5" > /etc/redhat-release
Changes on SCOM 2007 R2
Tasks to do:
- Allow WinRM to get basic authentication
- Import Management Packs Linux/Unix generic and Red Hat
- Add a Basic Authentication account to log on Linux (not root)
- Add a Basic Authentication account to log on Linux (Root)
- Link them to profiles "Unix Action Account" and "Unix Privileged Account"
- Discover the VM and sign certificate
Adding the VM is straight forward if you followed the tasks before. So i will cover the problems i met.
Allow WinRM to do nasic authentication: If you don't have the good hostname, the certificate is refused when it's time to sign it:
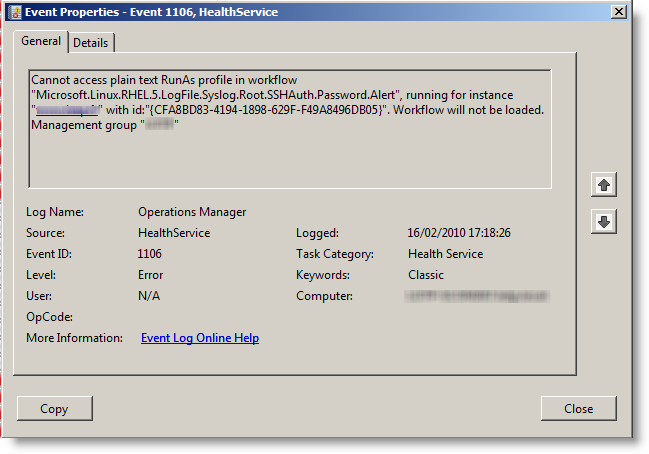
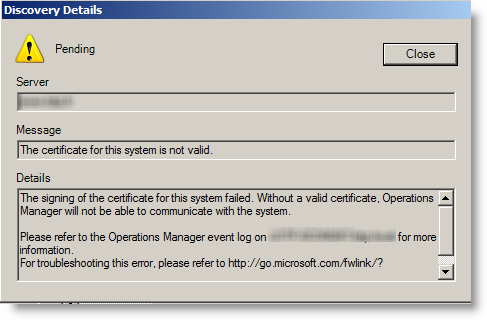 If you don't add linux account to profiles, workflow don't work:
At the beginning, the VM is not monitored and seen as unknown:
 Then it switch to green and known:
Here we go, your VM is now monitored by SCOM 2007 R2.
Here are some screenshots once it works:
08 February 2010
Amazon EC2: Very old Fedora image!
I wasn't mistrustful enough at the beginning. One explanation is that i know Linux, but i never used Fedora before, so i didn't know the actual version number....
How could i imagine that they provide a 2 years old image ? To remind, here is what they provide:
Version 8 is old enough that you can't upgrade in one shot. You have to upgrade first to version 10 to then upgrade to version 11. I realized that trying to install nagios version 3 without being able to find it...
I found the way to upgrade through Amazon forums:
http://developer.amazonwebservices.com/connect/message.jspa?messageID=141707
In short:
Upgrade to version 10:
yum update -y yum clean all yum update -y yum clean all rpm -Uhv http://mirrors.kernel.org/fedora/releases/10/Fedora/i386/os/Packages/fedora-release-10-1.noarch.rpmhttp://mirrors.kernel.org/fedora/releases/10/Fedora/i386/os/Packages/fedora-release-notes-10.0.0-1.noarch.rpm yum clean all yum update -y yum clean all yum update -y yum clean all
Upgrade to version 11:
rpm -Uhv http://mirrors.kernel.org/fedora/releases/11/Fedora/i386/os/Packages/fedora-release-11-1.noarch.rpmhttp://mirrors.kernel.org/fedora/releases/11/Fedora/i386/os/Packages/fedora-release-notes-11.0.0-2.fc11.noarch.rpm yum clean all yum update -y yum clean all yum update -y yum clean all
I highly recommend to start by upgrading Fedora version before anything else. As i realized the problem close to the end of my setup, i had packages issues after upgrading, and even some packages i had to remove before upgrading due to dependencies problems!
Mysql
At least the flush privileges wasn't working anymore:
mysql> flush privileges;
ERROR 1146 (42S02): Table 'mysql.servers' doesn't exist
mysqlcheck --all-databases --repair -u root -p mysql_upgrade -u root -p
Loaded plugins: dellsysidplugin2, fastestmirrorERR_OUT: : Bad addressERR_OUT: : Bad addressERR_OUT: : Bad addressERR_OUT: : Bad addressERR_OUT: : Bad address
yum remove smbios-utils-python
WDS/MDT: Remove F12
By default, To boot from the network through WDS, you need:
- set up the bios to boot on the network (F12 in many bios)
- Once you get a dhcp lease, you have to quickly strike F12 to really boot from the network
This second strike is a default safe option. If the boot order set the network before the hard drive, computers will try to boot from the network all the time. Most of the time, we just boot from the network to install OS, and then always boot from hard drive.
But if you correctly set up your bios, the second F12 is uneeded. You just have to replace pxeboot.com by pxeboot.n12 to remove it:
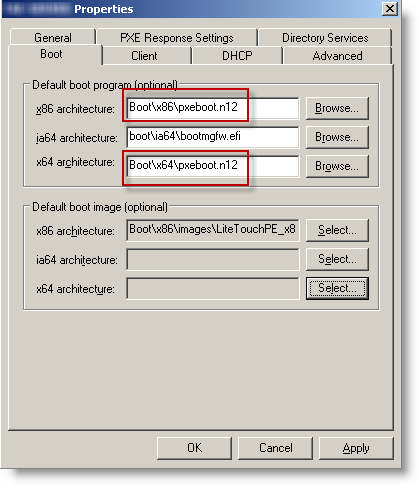 If you already have an important number of computers deployed, you can centrally configure their bios settings. Dell and HP provides central tools to set their bios remotely (generally through an executable that is deployed:
- Dell: Dell Client Manager
- HP: HP Client Manager


